 Forefront
Report Card Editor
Building and editing a course report card.
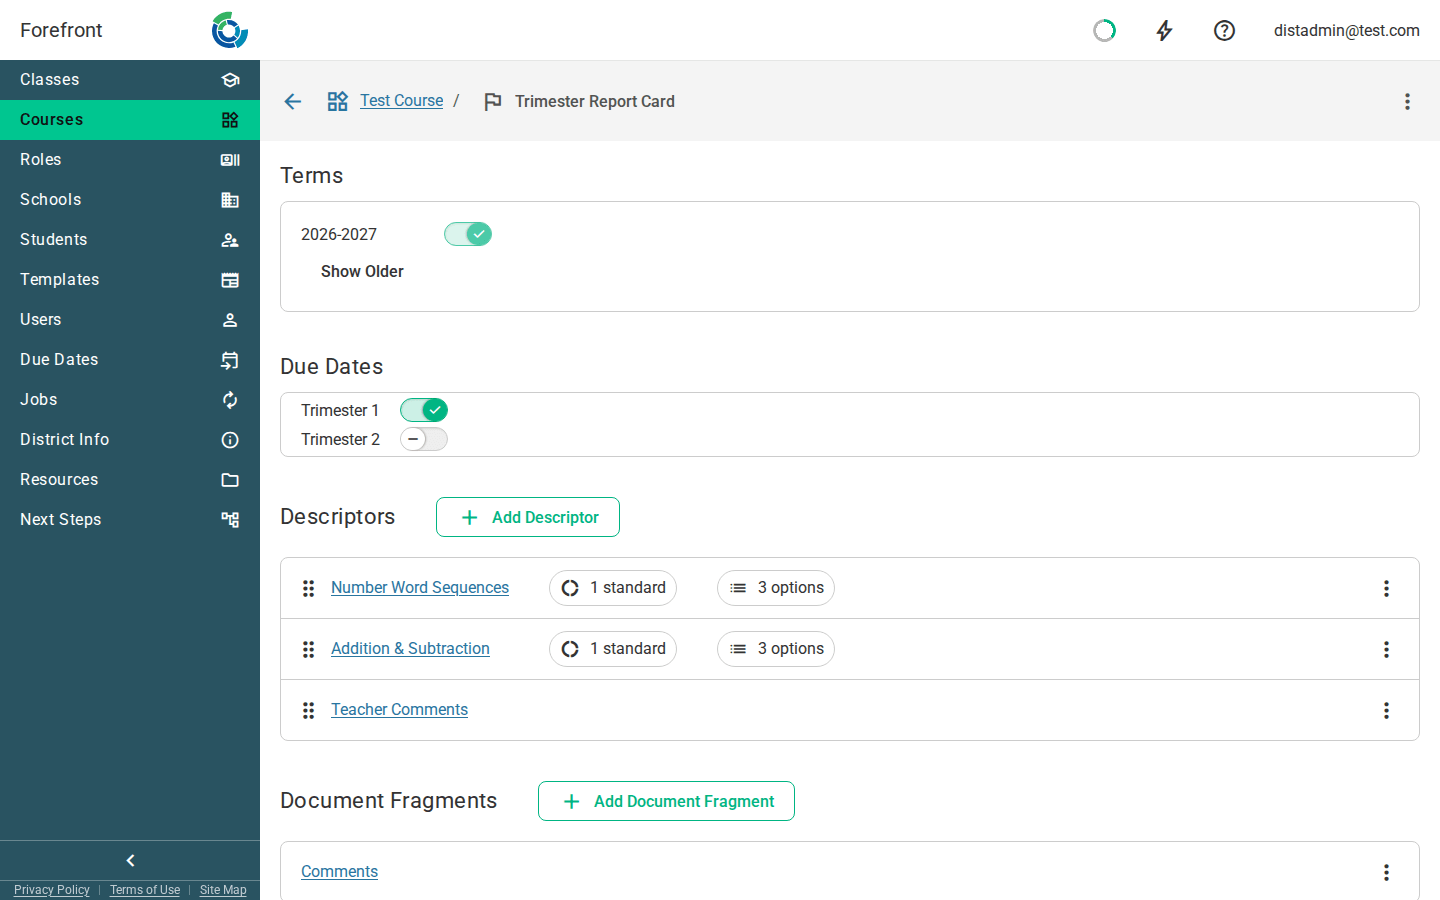
The Report Card Editor is where a district administrator builds and edits a course’s report card: the terms and due dates it covers, the descriptors (graded categories) that appear on it, and any reusable document fragments it prints.
Renaming and deleting the report card
The report card’s name is shown in the top bar next to a flag icon. Click the name (or open the actions menu ⋮ and choose Rename Report Card) to edit it. The same menu holds Delete Report Card, which asks for confirmation before removing the report card and returning you to the course. The back arrow takes you up to the course, whose name is shown as a breadcrumb.
You can’t delete a report card that teachers have already entered scores on. Forefront shows a message with the number of scores attached. To stop using a report card like that, archive it instead.
Archiving a report card
Archive a report card when your district no longer uses it, such as last year’s version of a card you’ve since replaced. Its scores are kept.
To archive a report card, open the course, find the card under Report Cards, open its row menu ⋮, and choose Archive Report Card.
Once a report card is archived:
- Teachers no longer see it. It’s removed from class report card pages and the gradebook, in every term, including past ones.
- It no longer prints on report card handouts.
- It’s left out of reports, such as school and district report card progress and the report card pickers.
- It isn’t carried into a new year when you roll report cards over.
On the course page, archived report cards stay at the bottom of the list, dimmed, with an Archived tag. You can still open one to look at its setup. They can’t be dragged or moved up and down.
To bring a report card back, open its row menu ⋮ and choose Unarchive Report Card. It returns to its old place in the list, and teachers see it again with all of its scores.
Cloning the report card
To make a new version of a report card with a few changes, open the actions menu ⋮ and choose Clone Report Card. You can also choose it from the report card’s ⋮ row menu on the course page. Name the copy (it starts as the original’s name followed by “(Copy)”) and select Clone. The copy then opens in this editor.
Before you clone, keep in mind:
- Teachers see the copy right away. It covers the same terms and due dates as the original, so it appears next to the original as soon as it’s created. It starts with no data.
- Add its fragments to a handout. The copy gets its own copies of the original’s document fragments. A report card handout only shows the copy once you add those fragments to it. Handouts that already use the original’s fragments keep showing the original.
- Changes stay separate. Editing the copy’s descriptors or fragments doesn’t change the original.
Terms
The Terms section lists your district’s terms as toggles. Turn a term on to include it on this report card. The two most recent terms show first; use Show Older to reveal earlier terms. At least one term must always be selected, so the last remaining term’s toggle is disabled. If no terms are configured, the section shows a placeholder telling you to set them up for your district.
Due Dates
The Due Dates section lists your district’s report card due dates as toggles. Turn a due date on to attach it to this report card. If none have been created yet, a placeholder notes that no due dates exist for your district.
Descriptors
Descriptors are the graded categories that appear on the report card. Use Add Descriptor to create one. You name it, then land on the descriptor’s own editor page to configure its standards, scoring options, note presets, and data behavior.
Each descriptor is listed as a row. Click its name to reopen its editor. Two hint icons summarize its setup at a glance: a standards count (hover to see the mapped standards) and an options count (hover to see the scoring options and their colors). When there is more than one descriptor, drag the handle to reorder them, or use the row menu’s Move Up / Move Down. The row menu also has Delete, which confirms before removing the descriptor. Before any descriptors exist, the section shows a “No descriptors have been created” placeholder.
Changing descriptors for a new school year
To grade this year against different descriptors, delete the ones you no longer use and add their replacements with Add Descriptor. Last year’s marks are kept. Report cards from past terms still show the descriptors they were graded against, marked Deleted for teachers, and those marks can’t be changed. This year’s report cards show only the new set.
Edit a descriptor in place only when the change should apply to past terms too. Renaming a descriptor, for instance, changes its name on last year’s report cards as well.
Applying district defaults to descriptors
Your district has a default display name, document name, and color for each proficiency level. Forefront sets these up for your district; contact your Account Manager to change them. When the defaults change, or descriptors have drifted apart, you can bring a report card’s options back in line without editing each descriptor. Open the actions menu (⋮) and choose Apply Defaults to Descriptors.
- District Defaults lists each proficiency level this report card uses, filled in with your district’s defaults. Change a color, display name, or document name here to apply your own value instead. Your edits apply only to the descriptors you update; the district defaults don’t change. If you clear a name, the district default is used.
- Drag a level by its handle to change the order of options. The first option is the one teachers see first. Dragging checks the box above the drag handles; with it checked, each descriptor’s options are rearranged to match, and Not Used options move to the end.
- Each column header has a checkbox; hover over one to see what it applies. Uncheck one to leave that part of every option as it is. Columns you uncheck are dimmed.
- Descriptors lists the report card’s graded descriptors and the document names they use today. Check the ones to update; the heading shows how many are selected, and the checkbox in the table header selects or clears them all. Notes-only descriptors aren’t listed, since they have no options.
- Descriptors whose document names have been changed by hand are tagged Customized and start unchecked, so their wording is kept unless you choose otherwise.
- If any of the options being changed already have student scores, a warning says how many. Report cards from past terms will show the new names and colors.
The button reads Apply to and the number of descriptors that will actually change. If nothing would change, it reads Apply and can’t be selected. After you apply, a message confirms how many options were updated.
Options set to Not Used keep their names and colors.
Document Fragments
Document Fragments are reusable blocks of printed content you can include on the report card. Use Add Document Fragment to create one by name and open its editor. Each fragment is listed with a link to reopen it and a row menu with Delete (confirmed before removing). If none exist, the section shows a “No document fragments have been created” placeholder.
The fragment editor’s Issues chip, in the top bar, counts anything in the fragment that will print blank, such as a field or cell color that reads a descriptor you’ve deleted from this report card. See Checking a Handout for Issues.
Editing a fragment
A fragment’s changes save automatically as you type. You can edit the same fragment from this page or from the report card handout’s layout, and a change made in one place shows up in the other.
Only one person can edit a fragment’s page at a time. If someone else already has it open, a banner at the top says who is editing and the fragment is read-only for you. Select Take Over Editing if you need to make a change. The other person’s view then becomes read-only.
If the fragment was changed somewhere else while you had it open, your next edit isn’t saved. You’ll see “This fragment was changed elsewhere. Reloading the latest version.” and the fragment reloads with the latest content. Make your edit again on the reloaded fragment.
Printing teachers’ notes in a fragment
To print the notes teachers write on the report card, insert a Report Card Note into the fragment and choose the descriptor whose notes it should print. Each student’s handout shows that student’s note in its place.
In the editor, a note appears as a green Report card notes label rather than the note itself, since every student’s note is different. In a narrow spot, such as a small table cell, the label shortens to Notes, then to just the icon, so it never spills into the cells around it. Hover over it to see which descriptor it prints. A note that doesn’t have a descriptor yet says so, with a button to choose one. In a narrow spot that becomes a smaller Set up button with an alert icon.
You can also control how the notes print. Click the note to select it, then use the regular text controls:
- Alignment (left, center, right, or justify) applies to the whole note and its label, replacing the teacher’s alignment. Center works well for a short note in a table cell.
- Font size sets the size for the note. Any text the teacher deliberately resized keeps the size they chose.
If you don’t set either one, each note prints the way the teacher wrote it.
Saving
Changes to terms, due dates, descriptor order, and fragments save automatically as you make them. If a change can’t be saved, you’ll see Unable to save report card and the page reloads the report card as it was last saved. Make the change again.
If the page can’t load
If the report card can’t be loaded, the page shows an “Unable to load report card” message in place of the editor. Reload the page or return to the course and try again.
More about this page
- Configuring Report Cards for your District: the end-to-end setup, from the district setting to descriptors and notes.
- Due Dates: where report card windows are defined.
- Teacher Report Card Overview: what teachers see once this is configured.
- How to Use Report Cards as a Teacher
- Printing Report Cards in Forefront
- Class Report Cards: the class-level page.