 Forefront
Slides
Build a slide deck in Forefront, or bring one in from PowerPoint, and play it in class without leaving the app.
Slides is a presentation that lives in Forefront. You can build one from scratch or import a PowerPoint you already have, keep it in a Resources folder alongside everything else, and play it in class from the app. There’s no file to download, email around, or find again on the day.
A deck is a resource like any other, so the folder it sits in decides who else can open it, and the usual Rename, Move, Clone, Public and Delete actions all work on it.
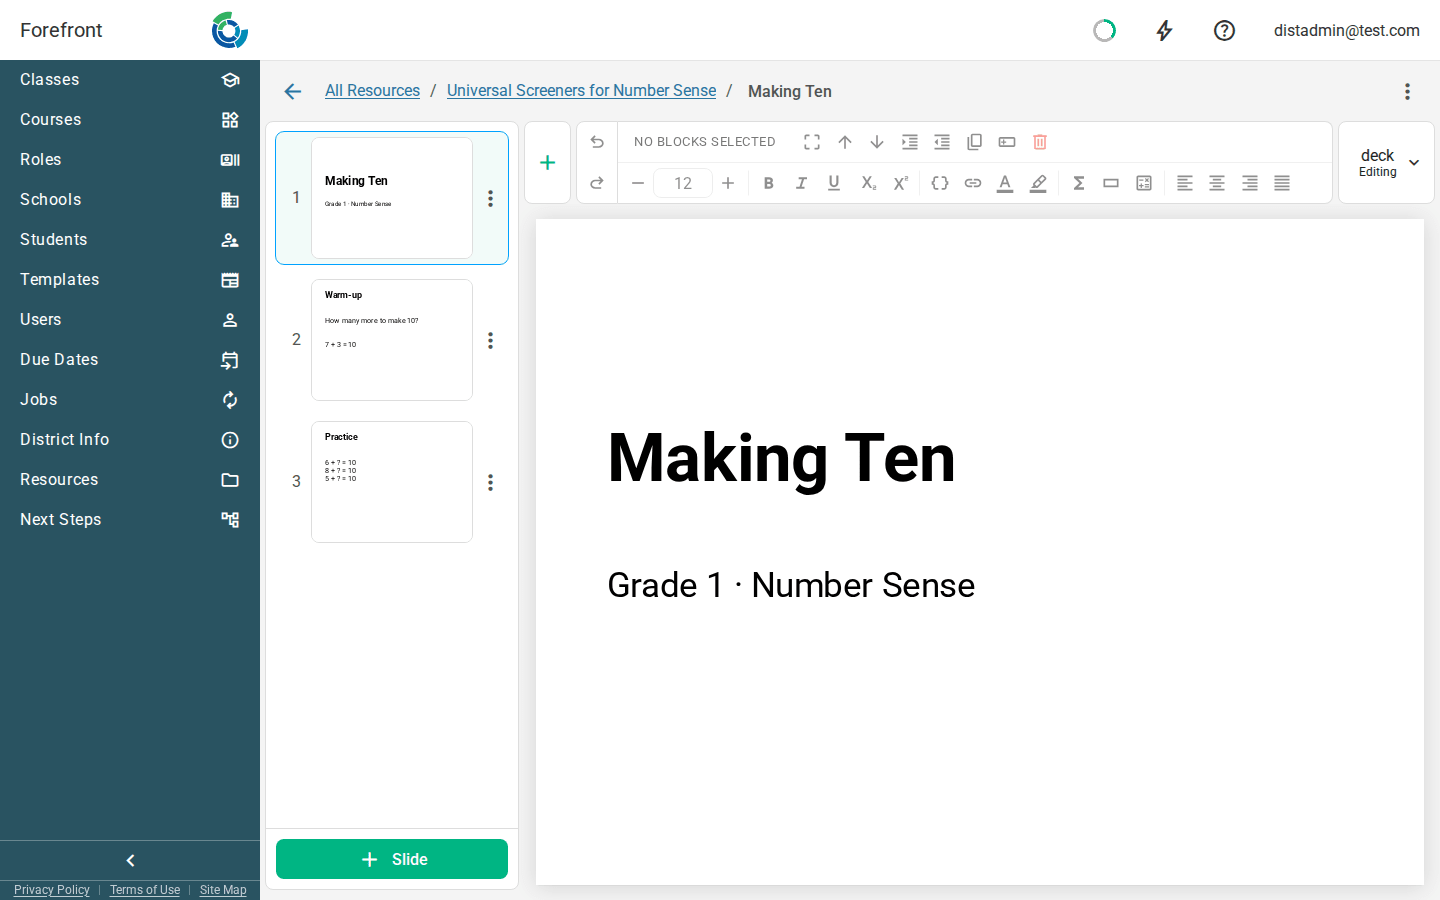
Creating a deck
- Go to Resources and open the folder you want the deck to live in.
- Click New + in the top right, then choose Create Slides.
Forefront makes an empty deck called Untitled Slides, opens it, and asks how you’d like to begin:
| Choose | What happens |
|---|---|
| Blank Slide | Starts you with one empty 4:3 slide. |
| From PowerPoint | Pick a .pptx and Forefront builds the deck from it. The prompt shows the file’s name while it imports and closes when the deck is ready. |
| Not Now | Dismisses the prompt. You can still do either from the editor. |
The prompt appears whenever a deck has no slides, so it comes back if you close it and reopen the deck.
To rename the deck, click its name in the top bar.
Bringing in a PowerPoint
Forefront imports .pptx files up to 50 MB. Google Slides and Keynote
both export to .pptx, so export first, then import that file.
There are two ways in, and they behave differently:
- From the start prompt, the import replaces whatever is in the deck. It’s only offered when the deck is empty, so there’s nothing to lose.
- From the editor’s ⋮ menu, choose Import from PowerPoint. This appends the file’s slides to the end of the deck, so a deck you’ve already worked on is never overwritten.
If the file you’re appending is a different shape from the deck (16:9 slides into a 4:3 deck, say), Forefront says so before importing, because those slides will be reshaped to fit and their content will stretch. Starting a new deck from the file instead keeps its original shape.
A deck of more than 200 slides imports its first 200, and tells you it did.
The PowerPoint file isn’t kept
Forefront reads the file, builds the slides from it, and deletes the file. The
pictures on the slides are extracted and stored as ordinary Forefront images;
the presentation itself is gone. Nobody, including you, can download the
original .pptx back out of Forefront afterwards, so keep your own copy if you
need one.
What comes across, and what doesn’t
Text and its formatting, pictures, tables, shapes, slide backgrounds, the deck’s fonts, click-by-click reveals, and links all come across. A picture or shape that opened a web page when clicked still does.
Where something couldn’t be brought over, Forefront tells you once the import finishes, in an Import Notes window listing exactly what and where, so you can read about any gaps before class. Nothing is added to the deck, so there is nothing to delete afterwards. Common entries:
- Charts, SmartArt and embedded objects aren’t imported.
- Pictures in a format browsers can’t show (EMF, WMF, TIFF) aren’t imported, and neither are pictures linked from the original file instead of stored inside it.
- Gradient or picture slide backgrounds. A slide takes a single background color, so a gradient is flattened to one color and a picture background is dropped.
- Animations other than appear, fade, wipe and transparency aren’t imported. The layer still shows; it just arrives without the effect.
- “Dim after animation” isn’t imported. “Hide after animation” and “Hide on next mouse click” are, so a slide that shows one box at a time still does.
- Links to another slide aren’t imported, whether on text or on a picture or shape. Links to web pages are.
- Text in a typeface the deck doesn’t use is set in the deck’s own font instead.
- A cropped picture is occasionally brought in uncropped.
- Shapes with no exact match are drawn as a rectangle, and a shape whose handles were dragged (a callout’s tail, an arrow’s head) is drawn at PowerPoint’s default proportions.
Two more differences worth knowing, which aren’t listed in the import notes because nothing is lost:
- Slide transitions, the effect between slides, don’t come across. Animations on a slide do.
- Speaker notes are imported and kept with the slide, but there’s nowhere in Forefront to read them yet.
Playing a deck
Opening a deck shows one slide at a time, scaled to fit the window, with the slide number underneath.
| To do this | Use |
|---|---|
| Advance one step | Click the slide, or →, Page Down, or Space |
| Go back one step | ← or Page Up |
| First slide | Home |
| Last slide, fully revealed | End |
| Either direction | The ‹ and › buttons in the top bar |
| Present full screen | The full screen button in the top bar; Esc leaves |
Full screen fills the display with the slide on black, which is what you want on a projector. The ‹, › and slide number come along at the bottom, so you can still click through without a keyboard.
“One step” means one click of the presentation. On a slide that reveals its content a piece at a time, each click brings in the next piece, and the click after the last piece moves to the next slide. Advancing off either end does nothing; the deck doesn’t wrap around.
Clicking something on the slide that has its own behavior, such as a link or a video’s controls, does that instead of advancing. The keyboard and the top-bar arrows always advance.
Editing a deck
The editor has the slides down the left and the slide you’re working on in the middle.
Slides
The rail on the left lists every slide with its number. Click one to work on it, drag it to reorder, and use its ⋮ for Duplicate, Move up, Move down and Delete. Add slide is pinned at the bottom, so it’s in reach however long the deck gets.
Layers
Everything on a slide is a layer: a text box, a picture, a shape, a table. Layers stack, so a later one paints over the ones before it.
Add one with the plus sign: Text Block, Heading, Ordered or Unordered List, Table, Divider, Image, or Shape (a rectangle, rounded rectangle, ellipse, triangle, diamond, star, arrow or line).
Click a layer to select it. Once it’s selected:
- Move it by dragging. A layer you can type into (text, a heading, a list) moves by the bar just above it, so that clicking its middle still places a cursor for typing. A picture or shape drags by its body.
- Resize it with the eight handles. On a picture or a video the corner handles keep its proportions and the side handles stretch it; on text, tables and shapes every handle stretches. Hold Shift while dragging a corner to swap that behavior either way. You can press or release it mid-drag.
- Rotate it with the handle above the box. The angle is shown as you turn, and it catches lightly on upright and the diagonals so you can land on them exactly. Hold Shift to turn in 15° steps instead.
Escape, or a click on the empty part of the slide, deselects.
To make a whole layer clickable, so that a picture or button opens a web page when it’s clicked during a presentation, right-click it and choose Add link. A layer that already has one shows a Link menu instead, with Edit link, Open link and Remove link. Clicking a linked layer in class opens the page in a new tab and doesn’t advance the slide. To link a few words in a text box, select them and use the ribbon’s link button (Ctrl+L), as anywhere else.
To change which layers sit on top, right-click a layer and open Layer: Bring to front, Bring forward, Send backward or Send to back. (The Move Up and Move Down beside it move a paragraph within a text box, not the box itself.)
With a layer selected, the ribbon gains a Slide section. Its layer menu lists the slide’s layers front to back. Hover a row to light up the layer it names, and use the menu to select a layer, move it forwards or backwards in the stack, or delete it.
Working with other people
Only one person edits a deck at a time. Anyone else who opens it follows along read-only and picks up your changes as you save them; the chip in the top bar shows who’s in the deck. Edits save on their own, so there’s no Save button.
Animating a slide
An animation is how a slide reveals itself a click at a time: the bullet that appears on cue, the answer that shows up after the question.
Open the Animation pane from the Slide section of the ribbon, or right-click a layer and choose Animate. Each entry in the pane is one layer arriving (or leaving), and the entries play in the order the pane lists them. Drag a row to change it.
The number down the left of the list is the click that fires the entry. Entries that share a number play together on the same click, so the number is drawn once per group.
Open a row to set:
| Setting | |
|---|---|
| Effect | Appear, Fade in, Wipe in, Fade out, Disappear, or Transparency |
| Amount | Transparency only: how see-through the layer becomes (25%, 50%, 75% or 100%) |
| Starts | On click, With previous (at the same time as the entry above), or After previous (as soon as it finishes) |
| Duration | How long the effect takes. Appear and Disappear are instant, so they have none. |
| Delay | A pause of up to a second before it starts |
To check it, use the transport controls at the top of the pane: Play runs the whole build, and the step arrows walk through it one click at a time. While a preview is running the slide behaves the way it will in class (click it to advance), and Escape or Done returns you to editing.
Transparency leaves the layer on the slide from the start. On its click the layer turns see-through and stays that way for the rest of the slide. Use it to dim something the class has finished with without hiding it.
A layer with no animation is on the slide from the start. Deleting a layer removes its animations with it.
Animations belong to the slide they’re on, so a deck where every slide reveals its bullets one at a time is set up a slide at a time.
Slides in a Next Steps item
If your district writes its own Next Steps, an item’s detail can hold a slide deck: an activity a teacher presents to the class. The deck sits in the detail like any other block, so it can stand alone or have instructions above and discussion questions below.
- Open the item and choose Edit.
- Put the cursor where the deck should go, open the + menu, and choose Slides.
- The deck editor opens with the same start prompt as a new deck: Blank Slide, From PowerPoint, or Not Now.
From there the deck is built and animated exactly as described above. The editor shows the slide at the size teachers will see it, so what you lay out is what they get. Changes save on their own.
Choose Back to Detail in the toolbar to return to the rest of the detail. There the deck plays just as teachers see it, and can be moved or deleted as a whole. To change its slides again, choose Edit slides on the deck, or pick it from the view menu in the top right. Choose Done to see the whole detail as teachers will.
Teachers play the deck from the item’s page, and printing the item prints every slide. Each slide prints the way you laid it out, with every shape showing. A shape that appears or disappears on a click still prints. See How to Access Next Steps Materials.
Current limits
- A shape’s fill, outline and shape can’t be changed after you add it. Only its position, size and rotation can. Delete it and add the one you want.
- Wipes always run left to right, whichever direction the original PowerPoint used.
- Decks are capped at 200 slides.
See also
- Resources: the folder tree a deck lives in, and who can see what.
- Handouts: the document tooling Slides is built on. The text, table and image blocks behave the same way.
- How to Access Next Steps Materials: where teachers find and play a deck in a Next Steps item.